Pedalboard Version 3
02 Feb 2025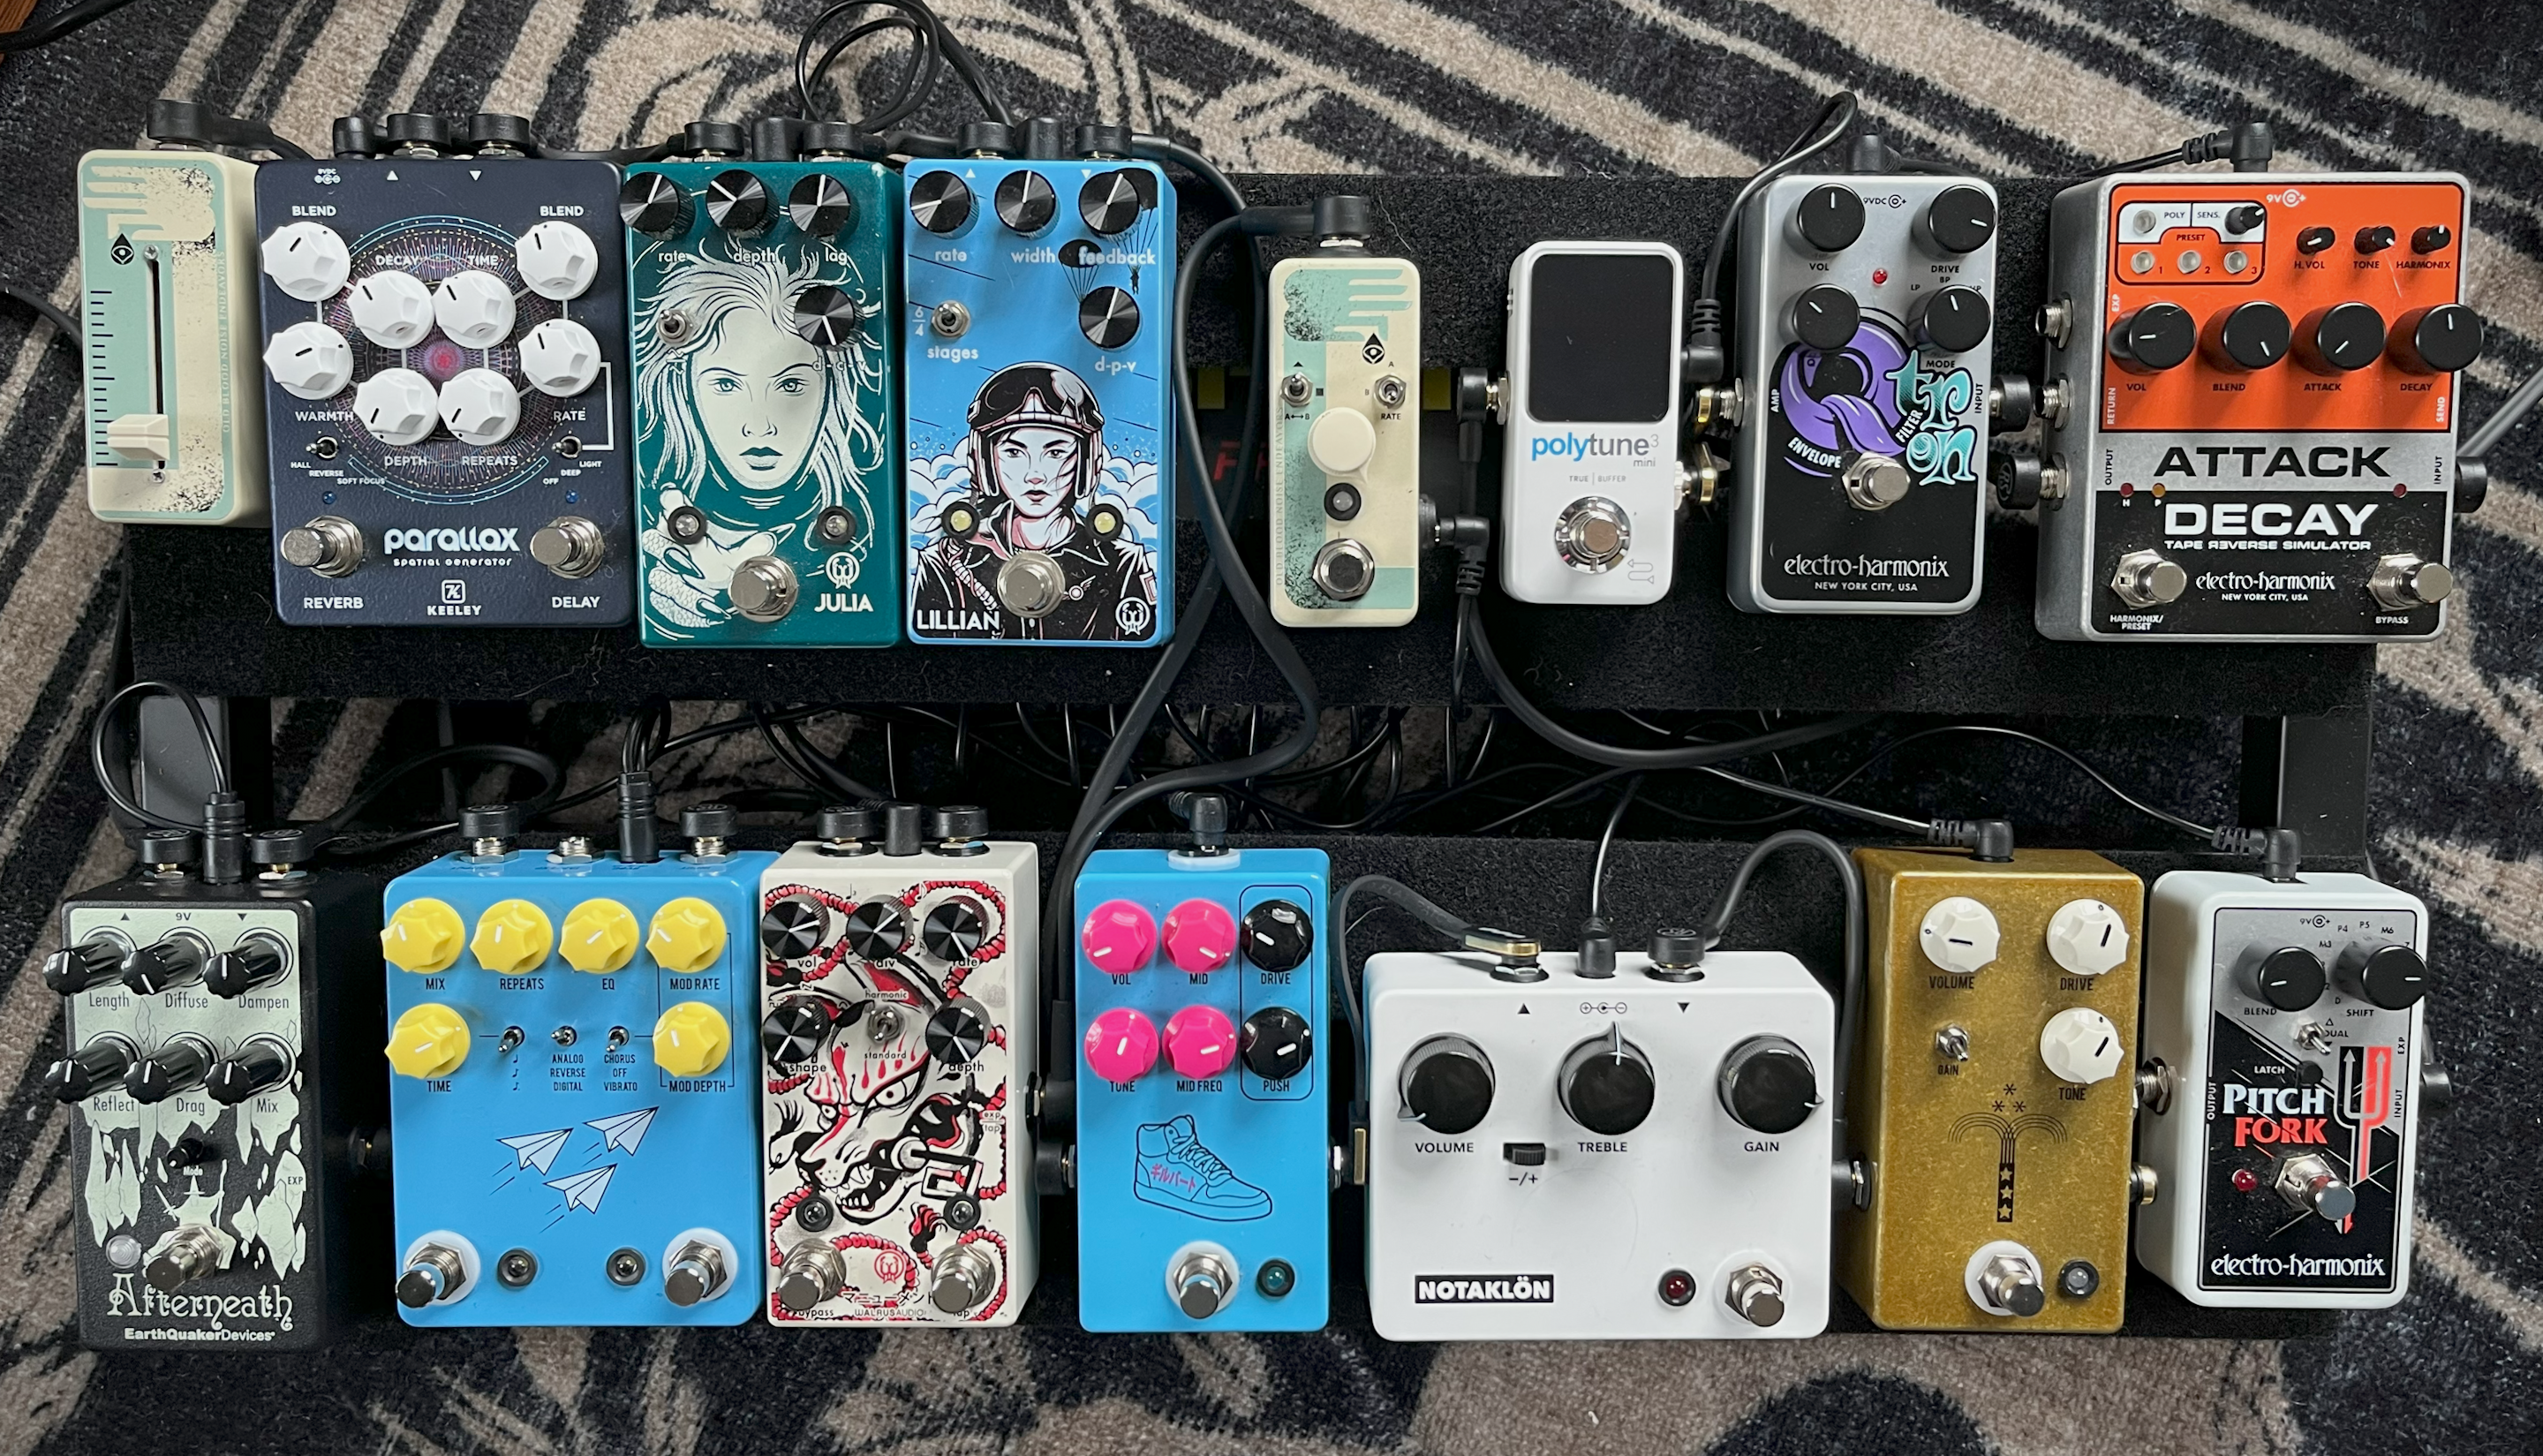
My guitar pedalboard has continued to evolve from its last iteration, and after many stable months of the same configuration I’m calling this “version 3.” Why change it at all? Two instigating events:
- My daughter built the JHS Notaklon and I needed to find space to fit it in. But also adding another “dirt” pedal made me question what I already had.
- While in Greece I acquired a tetrachordo bouzouki, an 8 string acoustic instrument. I wanted to incorporate that into my looping/recording rig, and to do that I needed a setup for capturing instruments with a microphone.
These challenges forced me to rearrange, but as I did I discovered opportunities to optimize and refine.
Microphone as an input
While this was built to be a guitar pedalboard… it has potential for more. For example I can plug a keyboard into it and add reverb or delay or any effect I like. But not every instrument has a 1/4” output. Some acoustic guitars have pickups built in and a 1/4” jack, but not all, and even still putting a microphone up to it is the best way to capture the instrument’s sound. My new bouzouki certainly has no built-in hardware. I’m also experimenting with other instruments, like the trumpet. So I need a way to capture instruments via my good ole SM57 microphone and put them through the pedalboard. For the difference in cabling (XLR vs. 1/4”) and signal compatibility I needed a microphone preamp.
The dirt section
Looking at my previous layout I had too many “dirt” pedals (overdrive/distortion): Morning Glory, Triumph, PG-14, and DS-1. I wasn’t finding enough distinction between these 4 to justify so many slots. I picked my favorite 2 to stay (the Morning Glory and PG-14)… and then added in the Notaklon. These 3 together give me a range where I do find myself using all of them. The Morning Glory is the most subtle and almost always on. The Notaklon gives me a great sharp lead tone (and stacks well with the Morning Glory). The PG-14 is flexible and gets used for heavier distortion and sputtery tones.
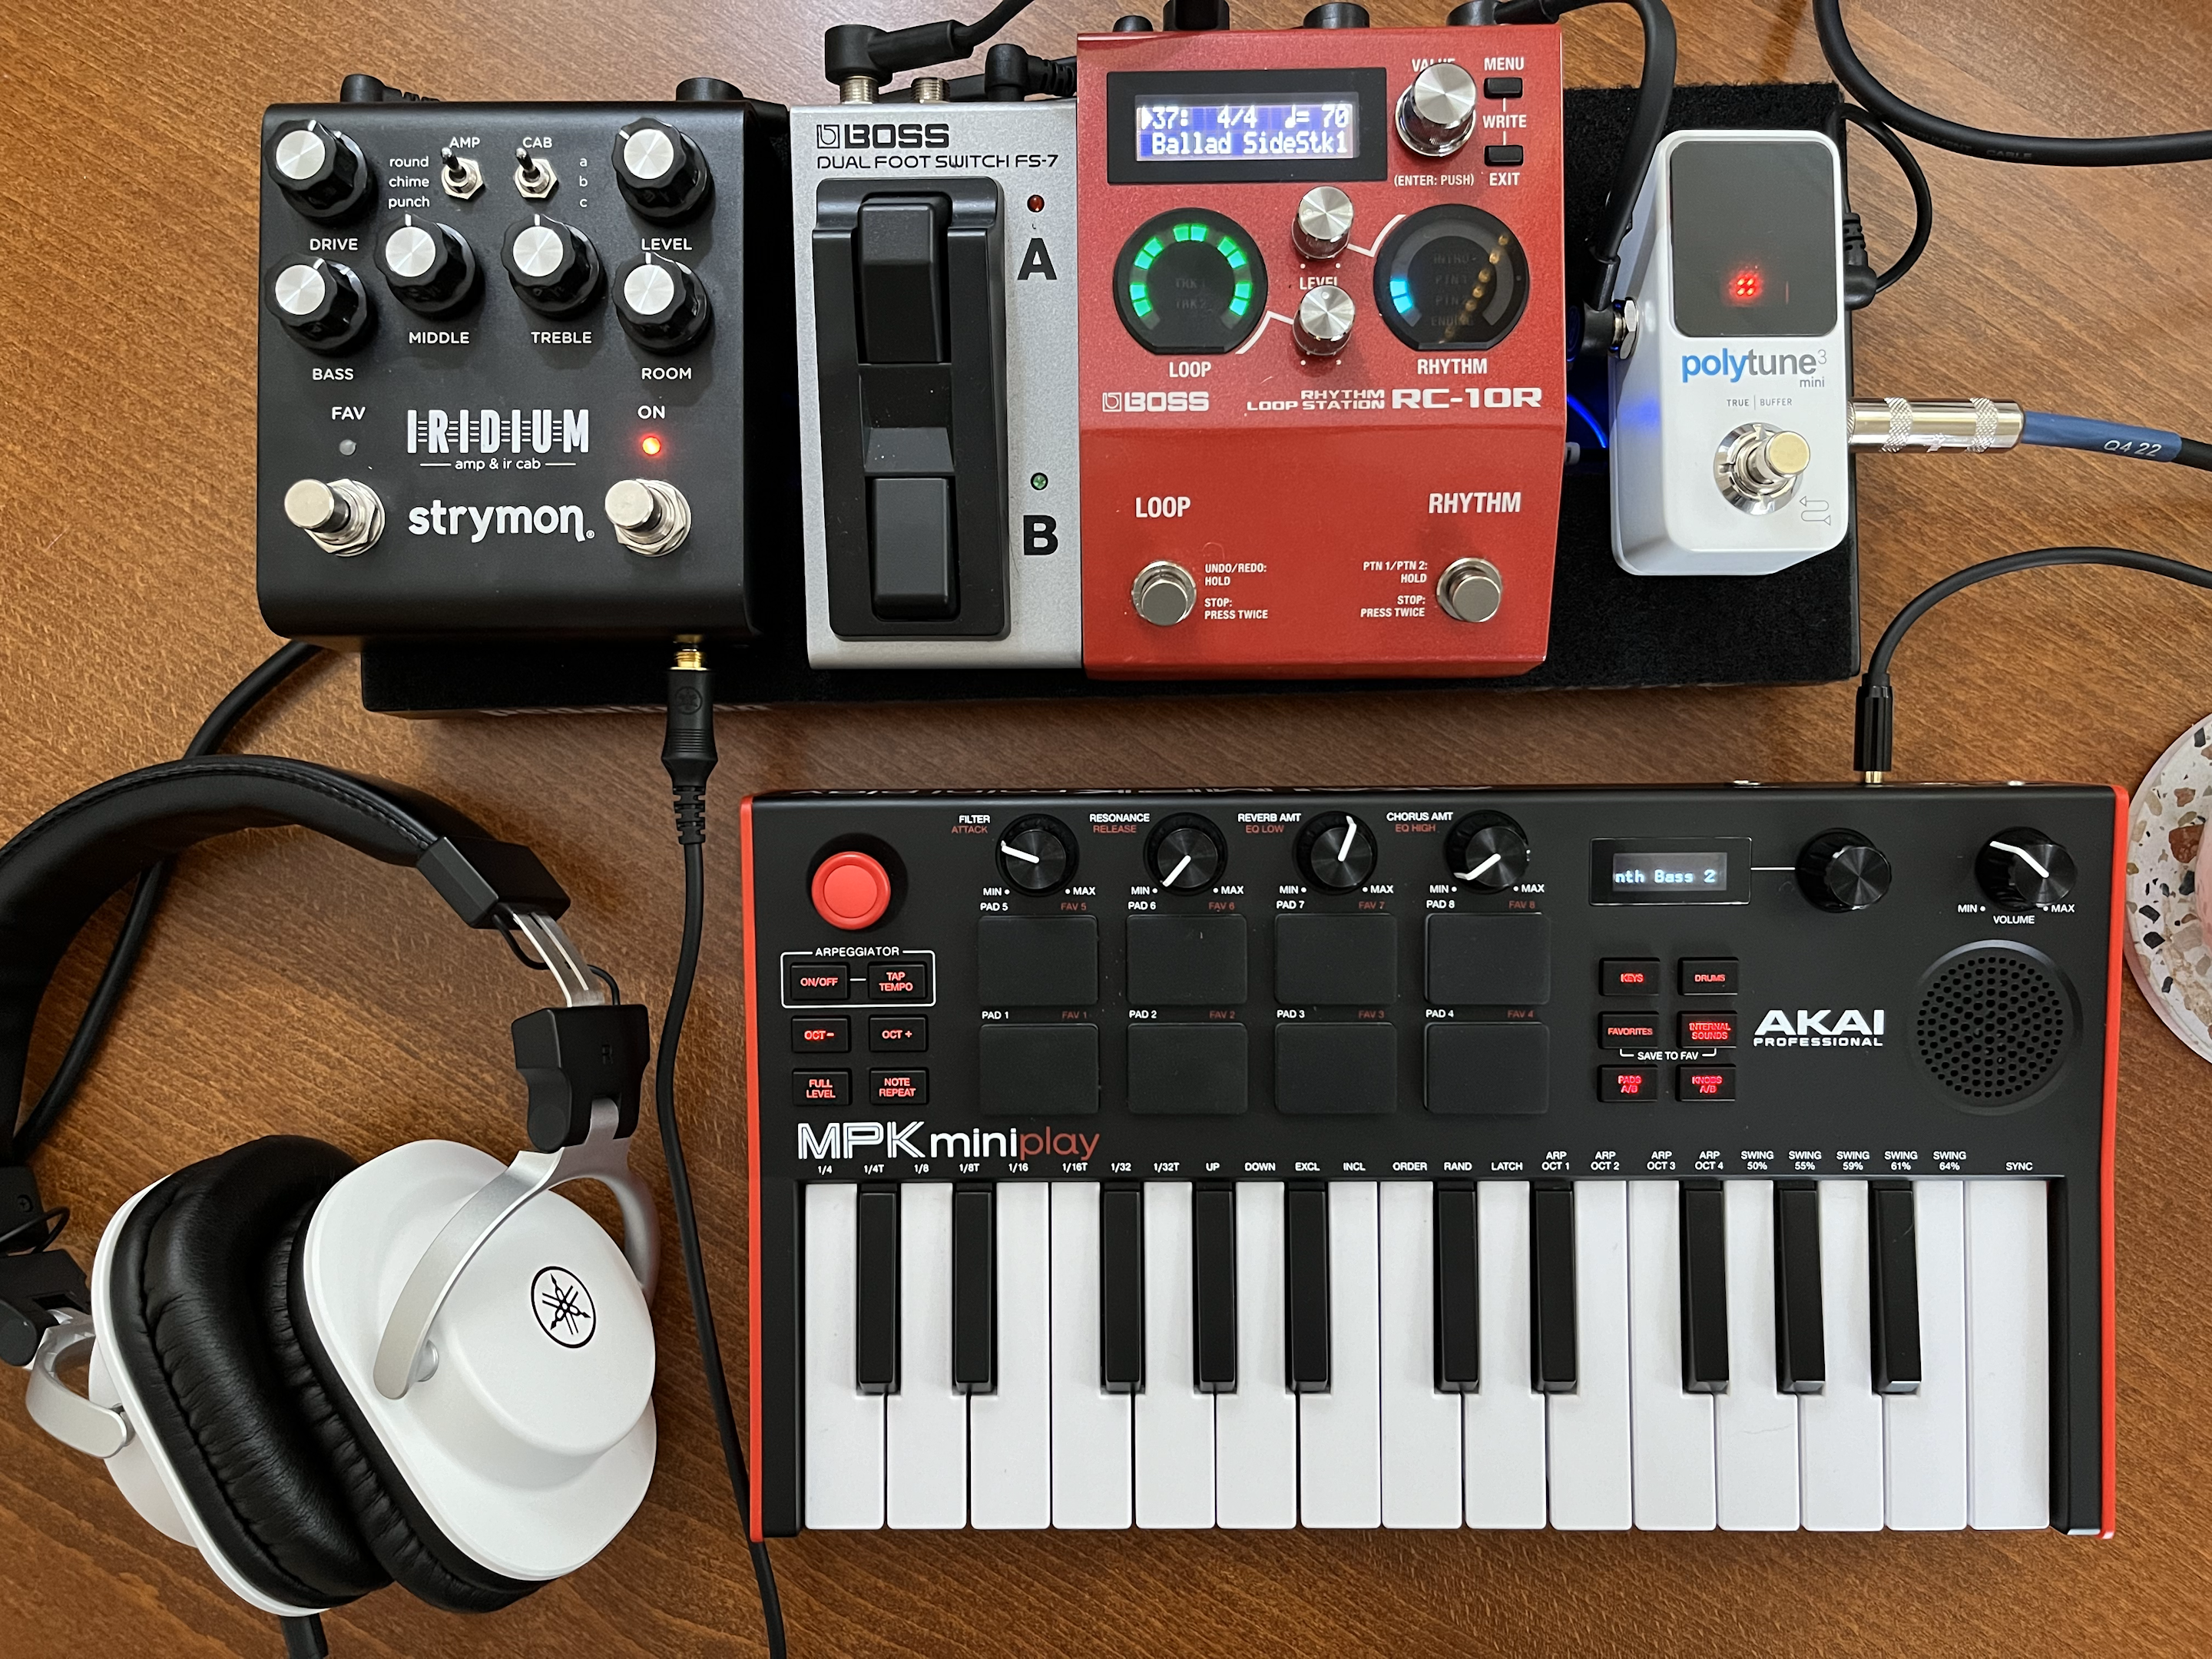
Looper as an output
One of my most essential pedals is the looper, which allows me to layer my past self beneath my current self. But the looper isn’t part of my sound, it’s merely a utility that receives the output of my sound at the end of the chain. Mentally, it’s different. So I had the idea to move it off the board and be its own thing.
Enter the “baby board,” a Pedaltrain Nano (with a power supply underneath). This allowed me to group some utilities at the end of the chain. It has the looper, an EQ, and an amp sim. When months later I went to go shop for a guitar I took the baby board into the store and had everything I needed to test instruments with headhpones on a familiar setup.
Did I cheat and solve my pedalboard space problem by adding a second board? Yes. But in doing so I stumbled into something I’ve found both more organized and more independently useful.
Now let’s go into detail on each of the pedals new to version 3.
Art Tube MP Studio V3
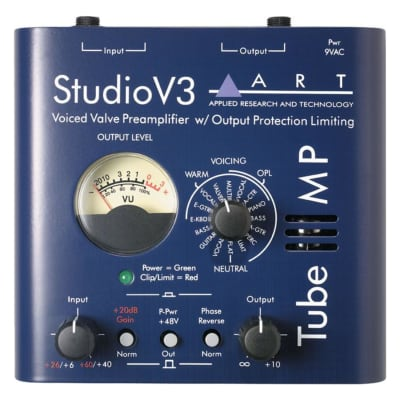 Without a microphone preamp if you plug a microphone into a guitar rig the levels are going to be way too low. It’s easy to use a microphone independently (into a mixing board or straight into a powered speaker), but my goal was to enable the live pedalboard effects for microphone input too. I opted for a reasonable used microhpone preamp. It works well enough, with some knobs to adjust the input signal. This pedal currently lives off the main pedalboard all on its own. So I have 3 sections in the chain that match my mental categorization: inputs (which has this mic preamp), sounds (the main pedalboard), and outputs (the looper and utilities).
JHS Mini A/B Switch
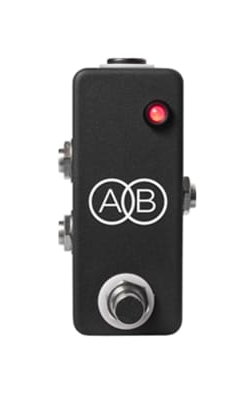 The goal of the board is to enable me to be creative in real time. When I have to bend down and fiddle with some cables, unplugging one and plugging another in… that gets in the way of being present. I want swapping the input from one instrument to another to be immediate. Enter the A/B switch. I have this set up to toggle between the direct instrument line in and the output of the microphone preamp. So with a quick tap I can switch between the Stratocaster and the bouzouki, or between a keyboard and a trumpet.
JHS NOTAKLÖN
 The pitch video for this DIY kit absolutely stole my heart. So I was among the initial wave of tens of thousands who flooded orders. I put it in front of my tween daughter, and she built me a guitar pedal. Which was a magic experience and I will always treasure this pedal.
Do I like the sound of the pedal? Absolutely I do. The Notaklon gives me a nice dirty overdrive that cuts through with a warm crunch. It stacks nicely with the Morning Glory if I want something even dirtier.
Stymon Iridium
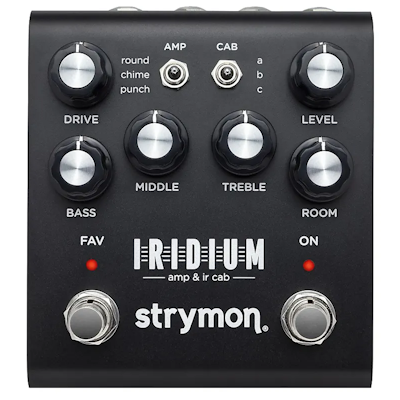 I’d had my eye on the Iridium for a while, waiting for the right price on reverb. This pedal is an “amp sim,” which is to say it emulates the sonic qualities of various amps in one tiny box. You can get the response you want (Fender, Vox, Marshal, or otherwise) at the volume you want and in a travel friendly format. This lives alongside my looper on the “baby board,” as it’s part of my output section.
I feel like I’m underutilizing it. The main speaker I have in my practice space is an amp (a Vox Mini Superbeetle), and running an amp sim into an amp is sonic double dipping. I’d rather pair with a more neutral output, but my practice space hasn’t otherwise warranted a PA system or monitors. However when I use the Iridium straight into my recording mixer or use it with headphones, everything’s great.
Boss FS-7 Footswitch
 My 2 button rhythm looper is so heavily used by me that I’ve felt some common functions could benefit from a dedicated button. Thankfully it can be extended and customized with an external foot switch. I use these 2 extra buttons for:
- Tap tempo: I can change the BPM with the main dial on the looper, which is precise but fiddly. With this footswitch I can mash the added button to get the time set fast and without bending over.
- Undo/Redo: Technically I can do a long press on one of the existing buttons to undo the last layer I recorded. But this is a common enough action that I prefer having its own button.
JHS Flight Delay
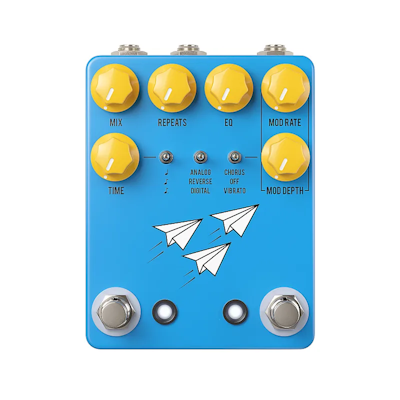 JHS made a great video to launch this pedal in late 2024. I’ve had delay effects through my Parallax, but there were some quality of life improvements I was seeking. Tap tempo is the most important one, as I have discovered that getting a delay timing dialed in with a knob is not fun. Tapping in with a foot switch is much more immediate and more accurate for my usage, plus there’s a knob to choose standard subdivisions. In fact a lot of what drew me to this pedal was the user interface; the way the functions are divided up between the switches and knobs is intuitive. Mostly the only thing this pedal gave me I didn’t have was tap tempo and reverse delay, but the way it’s packaged together has me feeling more in control.
Earthquaker Devices Afterneath
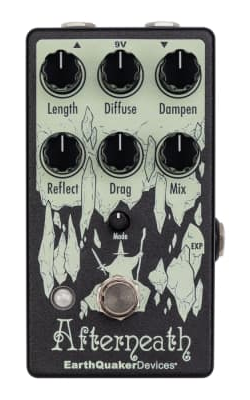 I didn’t need this pedal. I wanted this pedal. It has a wizard on it and an awesome name. And with it I can create cavernous ambient echoes. The pedal sits somewhere between reverb and delay; its effect is accomplished with delay, but it feels more like a reverb in creating a feeling of physical space. It’s the sort of pedal that inspires me to play differently. It also has an expression input that affects the key space of the echoes; that one is fun and inspired an additional purchase below.
Walrus Audio Monument
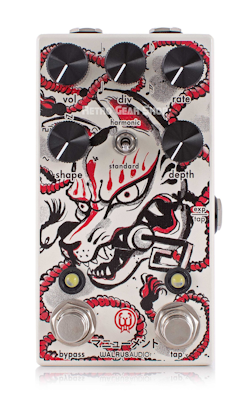 I was never dissatisfied with the JHS Tidewater tremolo on my board. But I’ve realized I really like tremolo, and if I was going to upgrade to something with a bit more control, my tremolo pedal would be a great candidate.
What the Monument gives me more than anything is tap tempo. Quickly while I’m playing I can mash in the rate I want for my tremolo and match it to what I’m playing. With a twist of a knob I can choose the subdivisions. I’m also able to adjust the waveform from triangle to a more choppy square wave, or choose harmonic tremolo. It’s a solid upgrade.
Walrus generally has awesome art on their pedals, and they also do limited runs of alternates. This is not the standard art for the Monument, but the “Kamakura” series. It certainly caught my eye, and I prefer it over the standard howling wolf. Although if I’m honest, it’s not the look I associate with the feel of tremolo. It’s very cool, but not perfect.
OBNE Expression Ramper
 Between the Monument, Afterneath, and Flight Delay… I had added several pedals with “expression” input options. Previously the only pedals I had with expression options were the Pitch Fork and the Attack Decay. With a stereo splitter cable it’s possible to use my volume pedal as an expression pedal… but then it ceases to be a volume pedal. So I wanted a dedicated expression pedal. Not a top priority, but when the right deal popped up on reverb…
I ended up getting 2 things. One is a slider, which is less for your foot and more for your hand, but the user interface nerd in me finds it charming. The other is this expression “ramper,” which allows me to program the start/stop values, speed, shape, and kick the whole thing off with a press of a switch (or put on loop). It’s a creative tool in my kit that I don’t use frequently but is pretty fun. I have the slider connected to the Afterneath (controlling the drag) and the ramper connected to the Monument (controlling the rate)